Progressive Challenge Step 4

Moderators: Rachel Kent, ACOT Employee

User avatar
SandyJay
Cherry Bomb
Posts: 3590
Gallery: 499
Location: Freeland, Michigan

Re: Progressive Challenge Step 4

Post by SandyJay »

Image
I used from my ephemera packs;
3 filmstrips, 3 lighter blue word pieces, enamel dots and a die cut I had laying around.  
The item from the list?  I used 3 star-shaped brads.  
THANK YOU FOR A FUN CHALLENGE AND FOR HOSTING!  
 
User avatar
GinniG
Cherry Cola
Posts: 6851
Gallery: 470
Location: Hollis Alaska

Re: Progressive Challenge Step 4

Post by GinniG »

Image

I used the 3 mushrooms, leaf and ticket die cuts from the two packs.  My finishing touches are the 3 flowers and the single acetate element which are the dark leaves under the ticket.  Everything except the 49 and Market and the butterfly stamp are really old stash
 
Image
User avatar
Tammey
Cherry Cola
Posts: 5768
Gallery: 2116
Location: Burton, MI

Re: Progressive Challenge Step 4

Post by Tammey »

I used 9 sequins-3 top left of circle, 3 at the bottom of right of photo, 3 after title.
I used 6 enamel dots 3 on each photo

I used 3 flowers and 3 hearts.

Image
  Image Image Image Image Image

User avatar
aceason
Cherry Bing
Posts: 2540
Gallery: 723
Location: Milton, WA

Re: Progressive Challenge Step 4

Post by aceason »

Image
My final step…from my original kit I used the yellow flowers and blue rhinestones and I added 3 phrase ephemera and 5 stitched buttons.
User avatar
sherriscraps
Sweet Cherry Pie
Posts: 1889
Gallery: 705

Re: Progressive Challenge Step 4

Post by sherriscraps »

Here is my finished page.  I added enamel dots (4), washi tape (4), clarinet sticker (1) and I added exactly 5 gold stars. 

Image

 
Retired, scrapping and happy!
Sherri 
Image
User avatar
emmapaige
Chatty Cherry
Posts: 24761
Gallery: 2439
Location: Eagleville PA

Re: Progressive Challenge Step 4

Post by emmapaige »

My final layout (unfortunately with the banners with fish tails).  I added my title, 9 rhinestones, five extra die cuts from my die cuts pack. Then I added exactly 3 stars and three-word phrase sticker (a new beginning) from Tim Holtz.

Image
** Chris **

My blog: http://mommomandpoppop.blogspot.com/

 ImageImageImage Image
 
User avatar
Helen W.
Cherry Picker
Posts: 503
Gallery: 164
Location: Sedona

Re: Progressive Challenge Step 4

Post by Helen W. »

Image

Added 3 word/phrase stickers and embellishments from my chosen pack. 
ImageImageImageImageImage
User avatar
Art_Teacher
Cherry Crush
Posts: 34464
Gallery: 2322
Location: Ohio

Re: Progressive Challenge Step 4

Post by Art_Teacher »

Here is mine. :)

I used most of the beads from one of my "embellishment packs."  Then, I used all 5 of the set rhinestones in the other one.  I added "exactly 3 flowers."  Love how this turned out!  Thanks for the awesome challenge!

Image
Laura
 Image    Image     Image  Image  Image
User avatar
GayleChurches
Cherry Blossom
Posts: 372
Gallery: 320
Location: Michigan

Re: Progressive Challenge Step 4

Post by GayleChurches »

Image
For step 4 I added one brad and nine sequins from my embellishment packs and I added 3 phrase/word embellishments (Go, the good life and all the little things) from the list.
Image
User avatar
MTCanuk
Chocolate Covered Cherry
Posts: 7619
Gallery: 2028
Location: MT

Re: Progressive Challenge Step 4

Post by MTCanuk »

Here is mine.

  Image

From my embellishment pack I added the title ,  7 clear dots, 2 enamel dots, 1 brad
And I added I acrylic leaf spray, 3 flowers, and 3 word phrases.  
ImageImageImage
ImageImage

Leslee

 
User avatar
pawprints
A Cherry on Top
Posts: 47250
Gallery: 1041
Location: Long Island, NY

Re: Progressive Challenge Step 4

Post by pawprints »

Here is mine. From the list of finishing touches I chose the tag and the three flowers. I punched the tag from side two of one of the papers that I chose, and I punched the flowers from the other papers that I chose. Thanks for a fun challenge!

Image

My kit:
Image
Image

 Image Image Image Image

 
User avatar
wazzu94
Sweet Cherry Pie
Posts: 1435
Gallery: 349
Location: Sherwood, Oregon

Re: Progressive Challenge Step 4

Post by wazzu94 »

This was such a fun challenge!  Thank you for being a hostess and your creative to create this fun adventure!!

Step 4, added:
title
embellishments from the 2 packs (3 gems and 2 enamel dots)
3 phrase stickers
1 tag with fibers/twine

Image
Suzann
Image
Image         
 ImageImageImage            
User avatar
scrappinmom99
Chocolate Covered Cherry
Posts: 9643
Gallery: 1360
Location: NYC

Re: Progressive Challenge Step 4

Post by scrappinmom99 »

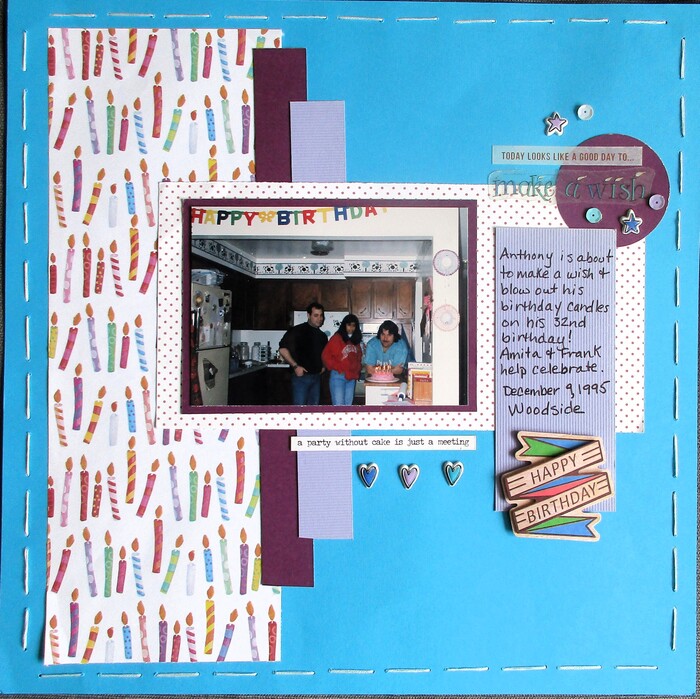
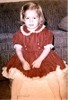
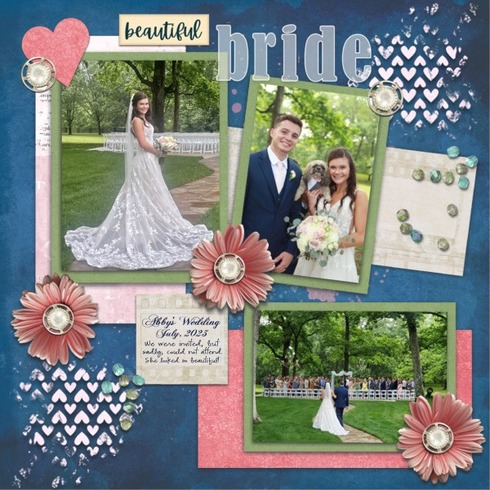
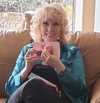
Woohoo, here is the layout in all its finished glory LOL! I really enjoyed the progressive challenge again this year! Would you believe this is the ONLY photo from DH's (then BF lol) 32nd birthday? Ugh, photography in the 90s LOL!


Title: Happy Birthday sticker

5 embellishments from the kit packs: 2 puffy stars & 3 sequins

Extras:

3 phrase stickers - in the circle ... one says Today looks like a good day to: and the one under that says Make a Wish. Then under the photo is one that says a party without cake is just a meeting

Exactly 3 hearts under the photo


Image
Happy Scrapping!
Anne-Marie
Image
User avatar
Retiree3
Wild Cherry
Posts: 15116
Gallery: 5437

Re: Progressive Challenge Step 4

Post by Retiree3 »

Embellishments from my kit- sequins and flowers.
From the list I added 3 hearts and 3-word ephemeras .                                                                                                                                                                                                 -

Image


[
Donna-Retiree3-Proud Grandmother of Three Boys!

[highlight=#000000][/highlight]


User avatar
StacyLee
Cherry Garcia
Posts: 4279
Gallery: 927
Location: SW Florida

Re: Progressive Challenge Step 4

Post by StacyLee »

This was SO fun! Here's my finished project. I've never done a progressive challenge before, I'd definitely do one again  :greenlol:

I used the cardstock sticker for my title from the sheet I included in step 1.  I also used 3 enamel dots and 2 brads from the embellishments included in step1.  For my finishing touches I chose a tag with twine and exactly 5 stars. They are wood veneer scattered in the corner areas and one large one resting on the tag.  I'll probably add some journaling strips, but for the purposes of the challenge....it's done! Thank you  :greenlol:
Image
Stacy

 ImageImageImage

 
User avatar
stinkerbelle
Cherry Bing
Posts: 2596
Gallery: 687
Location: AZ

Re: Progressive Challenge Step 4

Post by stinkerbelle »

from my original kit i used 2 puffy phrases and 3 blue enamel hearts
from the list i added 3 chipboard hearts

Image
*Stacy*  

Image  Image Image Image
User avatar
Donna_Coughlin
Sweet Cherry Pie
Posts: 1659
Gallery: 539
Location: Wyomissing PA

Re: Progressive Challenge Step 4

Post by Donna_Coughlin »

Here is mine, I used the Boo Brad and 4 enamel dots and I added a tag.
Image
Donna
ImageImageImage
User avatar
blbabe1234
Cherry Bark
Posts: 78040
Gallery: 3695
Location: Corpus Christi, TX

Re: Progressive Challenge Step 4

Post by blbabe1234 »

Totally love how this came out! Thank you Louise for a very awesome challenge!

I used the alphas from Step 1 to create the title.
I used one toolbox brad from the first embellishment pack.
I used 4 yellow stars from the second embellishment pack.
I also used 3 word stickers to finish it off. (You Rock; Awesome; Little Helper)

Image
Brandy 🐾 🐾 ❤️

  ImageImage   ImageImageImage
User avatar
Sharmon P
Cherry Tart
Posts: 31
Gallery: 48
Location: Michigan

Re: Progressive Challenge Step 4

Post by Sharmon P »

Thanks....this was so much fun.
I added 5 of the dots from my 2 packages and I also added 3 hearts cut from one of my pattern papers.
Image
Sharmon

Follow me on Instagram for more scrappy fun @tpgirl_scraps
User avatar
love2stamp
Cherry Cropper
Posts: 11892
Gallery: 1032
Location: Nebraska

Re: Progressive Challenge Step 4

Post by love2stamp »

My embellishments from my kit are the enamel dots, the camera, and the 3 stars. Then I added Exactly 3 hearts from the list. 

Image
ImageImageImageImage
Post Reply

Return to “National Scrapbook Day 2024”